
Create an agent with the skill builder
An end-to-end walkthrough — describe an agent in plain English, refine the drafted skill in a conversation, review and test it, configure the agent, and watch the first build.
This guide walks the whole journey from a one-sentence idea to a running agent, using the conversational skill builder. Each step links to the reference page that covers it in depth.
Before you start
- A workspace. Agent creation is scoped to the workspace selected in the sidebar. If you have none yet, see First login.
- The builder available. The describe box on the create screen is active when your platform's builder service is configured; otherwise it shows as coming soon and you start from a catalog skill instead.
- Registered tools, if the skill needs them. A skill can only depend on tools admitted to your org's Tool Registry — the builder picks from what is registered and cannot introduce anything else.
- Tool connections, if the skill acts as a service identity. For tool servers whose operations run as a workspace account, a workspace admin must have created a service connection under Connected Accounts first — the builder binds the skill to a connection by name.
Step 1 — describe the agent
Go to Build → Agents and click New agent.
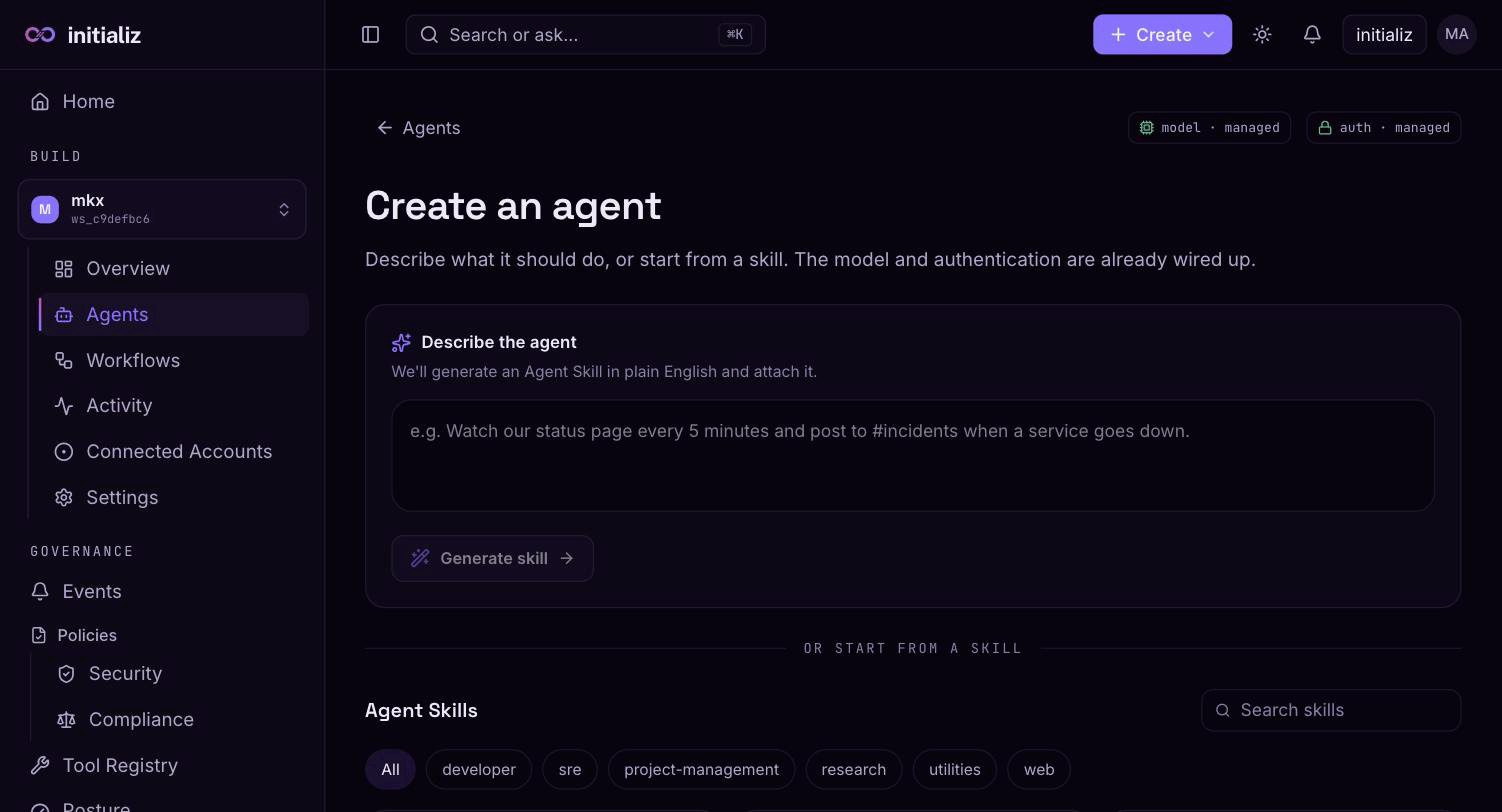
The entry screen offers two starting points: the Describe the agent box, and the searchable skill catalog below it. This guide takes the first path — type what the agent should do, in plain English:
Watch our status page every 5 minutes and post to #incidents when a service goes down.
Click Generate skill. The console jumps straight into the skill builder, showing your prompt and a thinking indicator while the first draft is generated. (Picking a catalog tile instead skips the builder and lands directly on the configure screen of Step 5.)
If you left a builder conversation unfinished earlier, the entry screen shows a Continue where you left off card listing your open sessions — each with its state ("in conversation" or a drafted version) and last activity. Resume one instead of starting over.
Step 2 — iterate in the skill builder
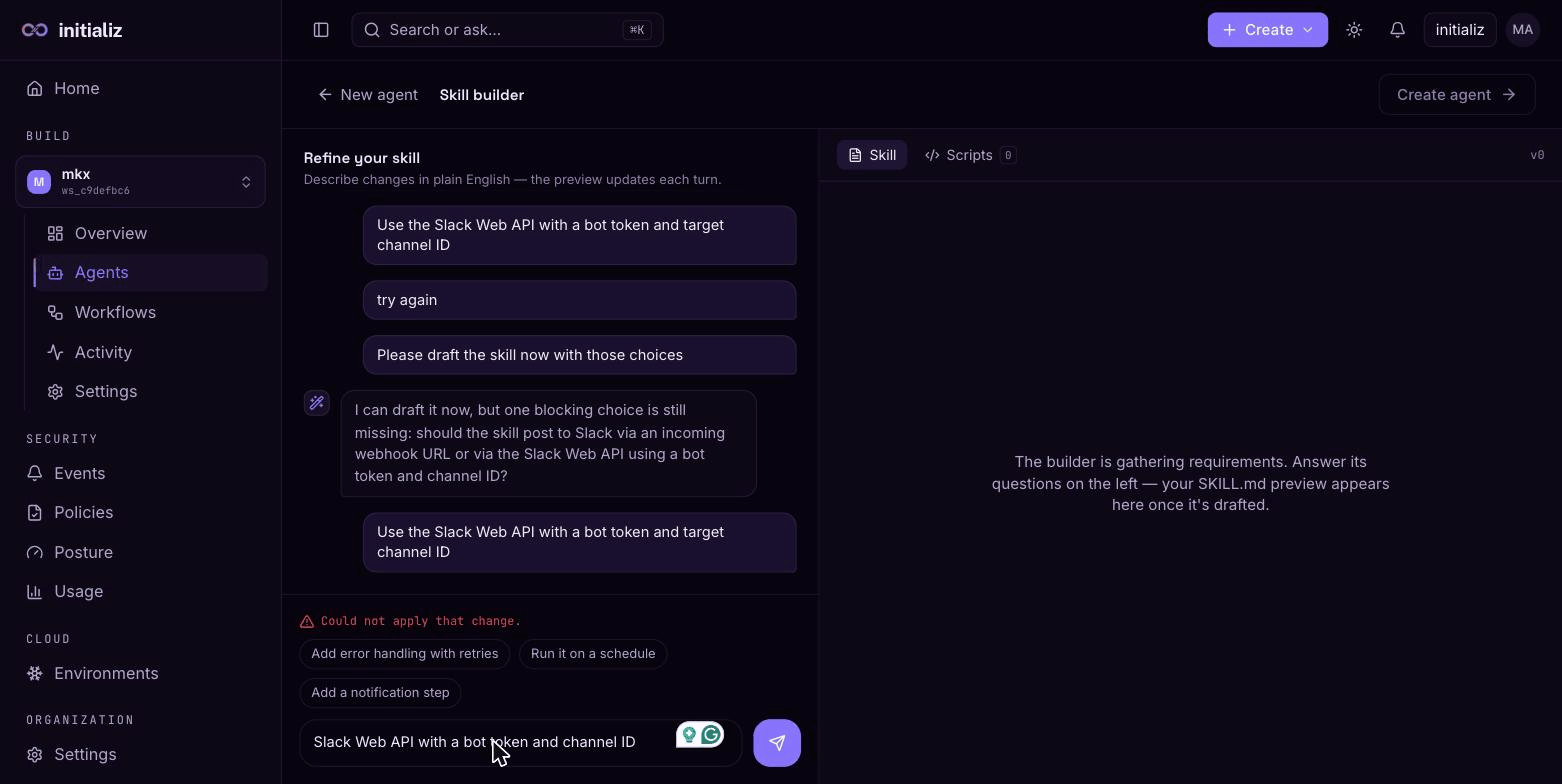
The builder is a split screen:
- Left — the conversation. The builder may ask clarifying questions before it drafts anything. Once a draft exists, every message you send refines it: "add error handling with retries", "run it on a schedule", "post a summary instead of the raw output". Suggestion chips propose common refinements.
- Right — the draft preview. A live view of the drafted skill, updated on every turn, with the parts changed by the last turn highlighted. Until a draft exists, the preview explains that the builder is still gathering requirements.
Every turn produces a new draft version (shown at the top of the preview). The version dropdown lets you go back: pick an earlier version and click Restore — the restore itself becomes a new version, so nothing is lost and the builder's next turn knows you went back.
If the draft uses a tool server that acts through a workspace service connection, the preview shows an as picker on that tool — choose which named connection the skill acts as. The choice takes effect on your next message, when the skill regenerates against that connection's allowed tools.
The conversation is a durable session: navigating away loses nothing, and the session is kept for 24 hours after its last activity. You come back through the entry screen's resume card, or discard a draft you no longer want. See Skills for the full session lifecycle.
The Create agent button in the header stays disabled ("keep chatting until the skill is drafted") until the first draft exists.
Step 3 — review the draft
Before moving on, read what the builder actually produced. The preview has three tabs.
The Skill tab shows the drafted skill document (labeled SKILL.md)
top to bottom:
- The skill's title and description.
- Its tools — for each one, the script that implements it, a description, the typed input parameters (with required ones marked), the output, and example requests with their expected inputs.
- Numbered instruction notes the agent follows.
- Governed tools it depends on from the Tool Registry, with their selected operations and connection.
- Any binaries the agent image will install.
- Requires — the environment variables the skill declares, with secrets flagged.
- Egress — the domains the skill needs to reach.
- Any denied tools and safety constraints the draft carries.
The Scripts tab opens every generated script in an editor. Scripts are code — you can fix them directly instead of describing the fix in chat. Save writes your edit into the session, so the builder's next turn builds on it rather than clobbering it; Revert drops an unsaved edit. Either way, you see the exact script text the agent will run before anything is created.
Step 4 — test the draft
The preview's Tests tab lets you exercise the draft before creating anything. It has two levels:
- Static checks — deterministic pre-deploy checks, no model call. Run checks validates that tool parameter names are acceptable to the model provider (one bad name fails every call a deployed agent makes), that each tool's examples are valid JSON matching its declared parameters, that declared binaries are installable (or carry an install recipe), and that scripts are non-empty and free of shell syntax errors. Findings are listed as errors and warnings against the exact tool, script, or binary.
- Dry run — Replay examples sends each tool's example requests through the model with your real skill document and asks which tool it would call, with which arguments. Nothing executes — no script runs, no domain is reached. Each example becomes a pass or fail against its expected tool and input, so your examples work as an executable spec. You can also type any free-form request and Try it to see the would-be call. A run covers up to ten examples within a time budget; if it stops early it says so, and running again continues coverage.
That is the extent of pre-create testing: the dry run checks tool selection, not tool execution. Real end-to-end runs happen after the agent is deployed — you chat with it from its detail page (see Building and deploying).
Step 5 — configure the agent
When the draft looks right, click Create agent in the builder header. The configure screen opens, prefilled from the draft exactly as it would be from a catalog skill.
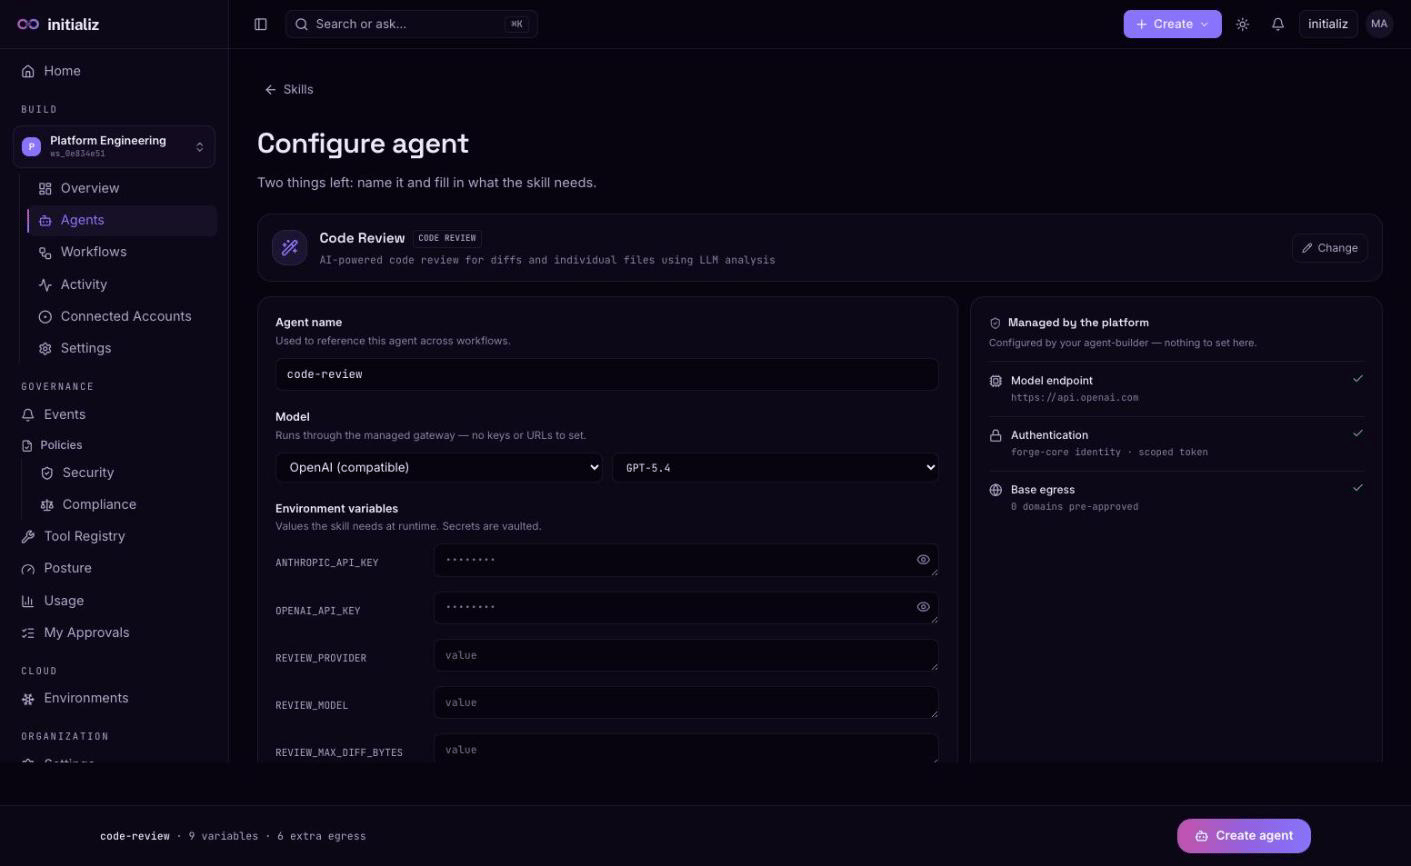
Work through it top to bottom:
- Agent name — how the agent is referenced across the platform, including in workflows. Prefilled from the skill's name.
- Model — a provider and model from the set your platform offers; several providers can be offered side by side, each with its own model list. Requests run through the managed gateway, so there are no API keys or URLs to enter. See Channels and providers.
- Environment variables — the variables the draft declared, with required ones marked. Secret values are masked and vaulted; you can add extra variables beyond what the skill declares. Tools that authenticate with a bearer or static token add their own secret row here automatically.
- Additional egress — the platform-managed base domains and the hosts of selected tool servers show read-only (they are merged in automatically); add any further domains the agent may reach.
- Tools — the draft's governed dependencies, shown for confirmation: this is where you adjust which registered tools the agent uses, which of their operations it may call, which named workspace connection each acts through, and per-operation identity and approval settings. Only entries from the Tool Registry can be selected.
- Trigger — human-triggered or scheduled / autonomous. An autonomous agent has no requesting person, so its tools cannot act as a user; autonomous agents can carry recurring schedules.
- Slack channel — optionally let people talk to the agent in Slack and receive tool-approval prompts there. Use a dedicated Slack app per agent (an app token and a bot token); the screen lists the bot scopes the app needs.
- Observability — two toggles, both off by default: capture audit payloads (record redacted tool and model inputs/outputs in audit events) and context compression (reversibly compress bulky tool outputs to save context).
- Governance — the Enforce PDP policy toggle, off by default. When on, every tool call the agent makes is evaluated against your compliance policies over its actual argument values, and enforcement is fail-closed: with the toggle on and no matching rule, the call is denied — an evaluation failure never falls back to allowing. Policies are authored under Governance → Policies → Compliance (org baseline) and on the agent's own Governance tab (per-agent tightening). See Compliance and tool-call decisions.
- Metadata tags — optional key=value tags applied to the agent's
runtime metadata. Keys allow
a–z 0–9 - _ .; other characters are folded to_. Acreated-byandworkspace-idtag are added automatically and shown read-only.
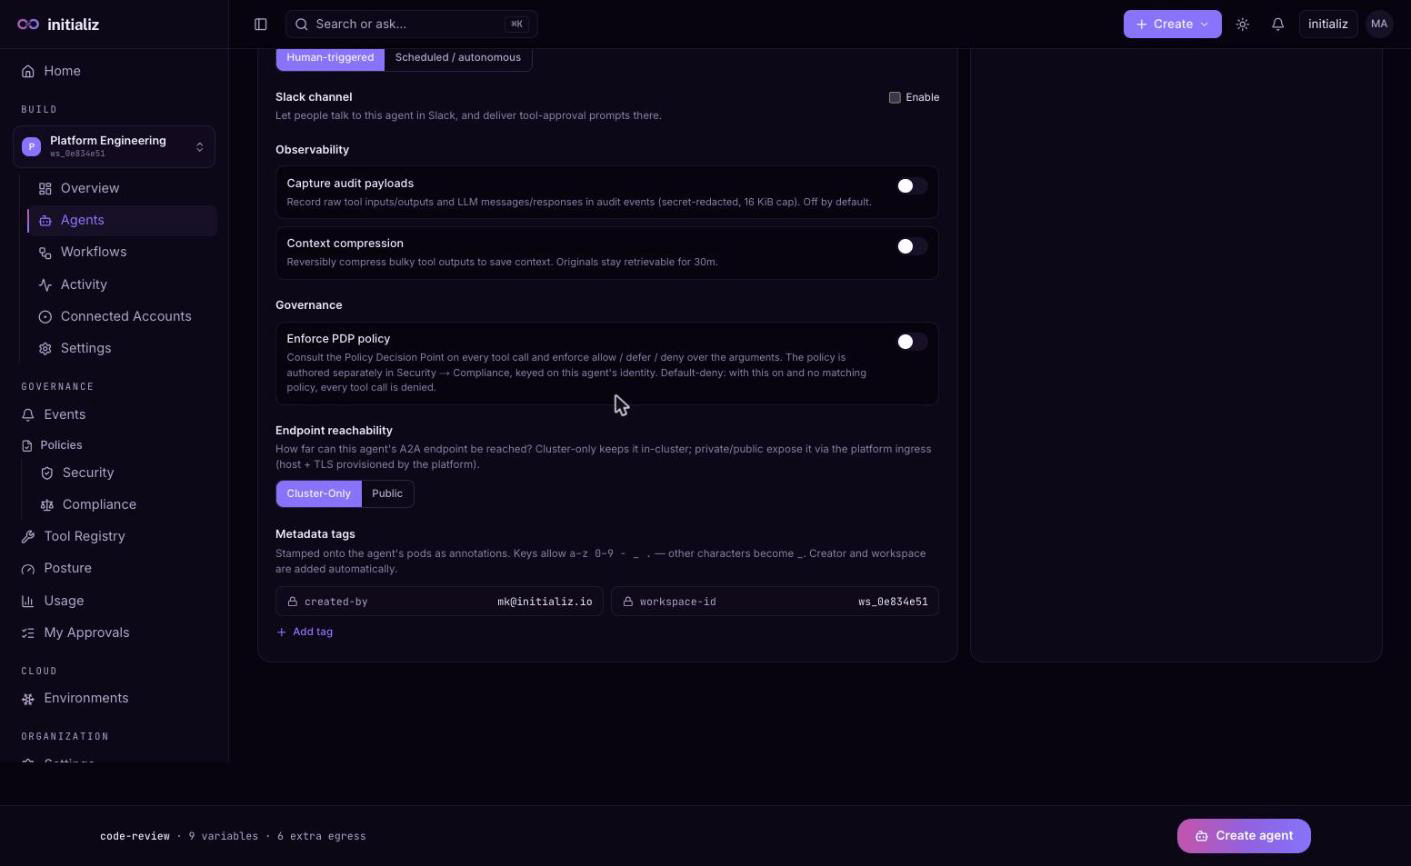
A read-only Managed by the platform panel alongside the form shows what you never configure: the model endpoint, authentication, and the pre-approved base egress domains.
Step 6 — create and verify
Click Create agent in the bottom action bar. The build and deployment start immediately, and the screen switches to a live progress view — the phase rotates from building through starting up to running (or failed), with the build log streaming below.
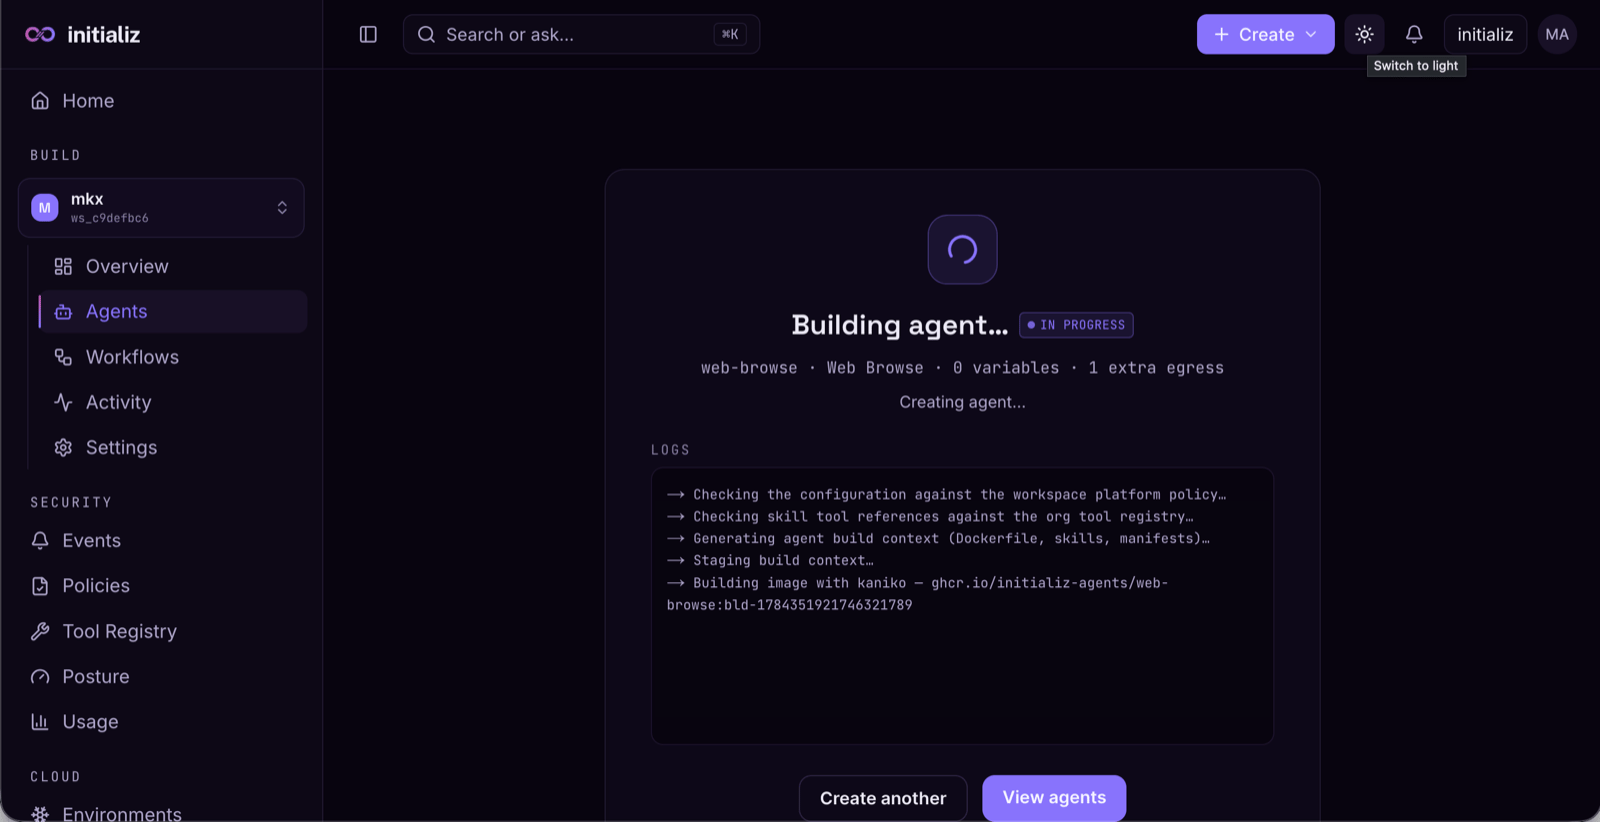
When the agent reaches running, open it via View agent. Its detail page is where you verify the result: chat with the agent on the Overview tab for a first real run, and read the run's audit trail on the Activity tab. If the build or rollout fails, the same screen carries the failure diagnostics — see Building and deploying for the phases, health states, and what to do when something goes wrong.
Creating the agent consumes the builder session, so it disappears from the resume list. The skill itself stays editable after deployment: the agent's Settings tab offers Edit skill, which reopens the same builder seeded with the current skill — see Skills.
How-to guides
Task-oriented, end-to-end walkthroughs of common jobs on the platform — follow one guide from start to finish instead of assembling steps from the reference pages.
Register an MCP server in the Tool Registry
An org-admin walkthrough — admit a remote MCP tool server into the org registry, choose how agents authenticate to it, discover its tools, and review the admitted operations.